Kamis, 26 November 2015

Baked yogurt Cheesecake with chocolate toppings

 This baked Yogurt cheesecake is so close to my heart . It was that time of the year when you feel loved, pampered by your loved ones. It’s a celebration in the family and where you are the center of attention...who will not feel top of the world. The tiny hands which had once encircled around Mama's finger has now grown up to be a handsome young man who takes all the effort in the world to make mama’s day a memorable one.
Yes indeed. It was really emotional for a mother to see before her eyes what a nice gentleman her boy has turned out to be. The thoughtful gift chosen by him knowing that how much I like baking was a real surprise to me. A gift so close to my heart. I have kept all his gifts since childhood, the cards which he had made for me to the chocolate wrappers …..how time flies.
As the day unfolds , it brings with it nostalgic memories of the time spent and how as a person I have grown all these years. I have been influenced by so many people in my life, my mother being the most influential among them. There are lot of friends who have influenced my thought process, who have pushed me out of my comfort zone to try out something amazing. They feel happy when they see me happy. 


So this is one such small gesture from me on this special day of my life for all my friends who have stood beside me like a rock solid support , in very trying times, relationships which understands no boundaries …this sweet surprises are for all those moments I shared with each one of you….This recipe is very simple to make and it has been adopted from the blog http://www.passionateaboutbaking.com.

What I really like about this cake is its simplicity and how it has combined the Indian and western concept so well. The use of dark chocolate along with the traditional sweet yogurt has enhanced the taste to a different level.

Prep Time: 10 minutes {plus extra for draining the whey}
Total Time: 30 minutes 
Ingredients:
  • 400gms sweet curd
  • 400gms of  condensed milk
  • 200ml  Amul  cream
  • 40g Amul dark chocolate
  • 1 tablespoon  pistachios
Lets learn how to make this baked yogurt cheesecake
  • Transfer the sweet curd to a muslin cloth and hang till all the whey drains out.
  • Preheat the oven to 180 degree.Line a round cake tin with aluminium foil and keep it aside.
  • Transfer the drained sweet yogurt to a large bowl and combine with condensed milk and cream and whisk till smooth.
  • Transfer the mixture to the cake tin and bake in the preheated oven for 25 to 30 minutes. Leave it in the oven to get cool . Demould and place on serving platter.
  • Grate the dark chocolate over it and garnish with pistachios and edible flowers.  

Senin, 23 November 2015

TURKISH YOGURT SOUP WITH RICE, MINT AND PAPRIKA FLAKES


Turkish cuisine is very rich in terms of variety of soups. Soups Known as “Corba” in Turkish forms a very important part of Turkish diet In rural Anatolia, it is very common for this yogurt soup be eaten as breakfast, for a substantial meal, throughout the year. Yayla Çorbası or "highland meadow" soup has drawn its name  Yayla from the word "yaylalar" or high mountains meadows in northern of Turkey where grazing is at its best and high quality yogurt and dairy products are found in abundance. In Turkey, this soup is considered a good menu to fight cold because it has mild and minty flavor which easy and light for your stomach. this yogurt and mint soup is one of the most basic, tasty and filling soups I have and since then it has become an indispensable part of my comfort foods list.
 
Yogurt is an indispensable kitchen staple in Turkey. It is added to salads, made into sauces with garlic to scoop onto pasta dishes, used to moisten the layers of borek  pies, to fix a refreshing yogurt drink, ayran, or turned into this wonderfully  light but still a filling soup called yayla corbasi.  Yayla chorbasi is somewhat similar to the Azerbaijani yogurt soup called dovgha , with the main difference being in the herbs used- the Azerbaijani soup features a variety of fresh herbs (cilantro, dill,  spinach etc), while its Turkish counterpart is flavored with dried mint only.


Cuisine: Turkish
Serves 4-6
Preparation time: 10 minutes              
Cooking time: 40 minutes

Ingredients:
  • 6 cups of water (you can also use vegetable stock)
  • 1/2 cup basmati rice, rinsed and soaked for 30 minutes
  • 2 tablespoon of  olive oil
  • 2  Cups plain, thick and creamy yogurt drained for 30 minutes
  • 1 tablespoon All Purpose Flour.
  • 1 tablespoon dried mint
  • Salt and ground black pepper to taste

For the dried mint & paprika flakes sauce:
  •  2 tablespoon Olive Oil
  • ½ tablespoon paprika flakes – you can use more for a spicier flavor
  • ½ tablespoon dried mint

 
Let's Learn How to make Turkish Yogurt Soup:
  • Soak the basmati rice in water for 30 minutes and hang the plain yogurt in muslin cloth to remove the excess whey.
  •  Bring the water to a boil in a heavy saucepan and add the rice. Stir well and simmer for about 20-25 minutes or until the rice is tender and has released its starch to thicken the soup. Remove from the heat.

  • Meanwhile in a bowl, combine the yogurt and  flour and beat until smooth (the flour stabilize the yogurt and keep it from curdling). From the pan, take a cupful of hot stock and whisk it into the mixture. Return the thickened mixture to the soup pan, stir in the dried mint and season with salt and ground black pepper. Stir well and simmer gently for another 10 minutes, or until the soup has a creamy consistency.

  • To make the dried mint and paprika flakes sauce, gently heat the olive oil  in a separate pan on a low heat. Stir in the dried mint and paprika flakes, stir and cook on a very low heat so that the spices don’t burn for about 30 seconds, until the spices start to sizzle. Whisk this sauce into the soup.


Recipe adopted from http://ozlemsturkishtable.com/

Note: The Original recipe calls for adding egg yolk which I have not used .You can also  presoak ¼ cup dried chickpeas in water for a few hours, then boil until tender. Drain the chickpeas and add them to the already cooked soup. 

Sending this recipe to Foodie Monday Bloghop theme called  "Soup"


Jumat, 20 November 2015

Coffee Cupcakes with vanilla Cinnamon Frosting


“There is more happiness in giving than there is in receiving.”

As winter starts approaching, it brings with it a whiff of freshness in the air, the rich aroma of freshly brewed coffee , the dew drops on the grass and the colorful blooms around. Not to mention the cold Cozy nights,warm blankets and hot chocolates.Winter is the perfect time for comfort, good food , warmth and of course its the time for home and family. When you think of winter and family how can you not think of the aroma of freshly baked bread and cakes in the Kitchen.

To welcome the winter,  I made this Moist , Buttery cupcakes with a dash of coffee and cinnamon which in the winters is pure bliss. These cupcakes brings out the essence of winter when you can cosy up with a warm cup of coffee or Tea along with a book to enjoy these melt in the mouth buttery cupcakes.

Prep Time: 25 minutes
Cooking Time: 20 to 25 minutes
Serves:15 nos
  
DRY INGEDIENTS

  • 2 cups All Purpose Flour minus 2 tbsp
  • 2 tbsp Cocoa Powder
  • 2 teaspoon Baking powder
  • 1 cup Sugar
  • 1/3 cup Butter
  • 1/4 cup Buttermilk
  • 1 teaspoon Vanilla essence
  • 1 cup of Coffee liquor 
  • 3 tablespoon Chocolate Chips

FOR ICING
  • 2 cups of Whipped Cream
  • 1 Teaspoon Vanilla essence
  • 1 teaspoon of Cinnamon Powder
  • 2 tablespoon sugar

Let’s Learn how to make Coffee Cupcakes

  •  In a filter coffee maker put 1 cup of  water and 1 tbsp of Coffee powder and boil for 5 minutes. Turn off the heat and collect  the coffee liquor in a bowl.  Set it aside.

  • Preheat oven at 180 degree. In a large bowl sift dry ingredients together. Strain it through a strainer. Take a spoonful of flour and coat the chocolate chips in it. Brush aside the rest of the flour .
  • Add butter and sugar in a mixing bowl and beat till sugar mixes well. Add the buttermilk, vanilla essence and mix everything well.
  • Now fold in the dry ingredients along with the 1 cup of Coffee liquor and mix everything till smooth.
  • The batter should be of pouring consistency.


  • Arrange Cupcake liners in a tray and pour the batter in the cupcake liner till 3/4th of the tin. tap the tray couple of times to release air. Place 3to4 chocolate chips cookies in each and bake for 20 to 25 minutes or till the cupcakes are done. My Microwave Convention took 26 minutes to prepare the cupcakes. Insert a toothpick to check if the cupcakes are done or not.If it comes out clean then your cupcakes are ready. or else you have to give it 5 more minutes in the Oven.

  • After the cupcakes cools down, mix the whipping cream, vanilla essence, sugar and cinnamon together and beat with and hand mixture till it forms a soft peak. 
  • Place the mixture in an icing bag and squeeze icing on top. Continue squeezing the cream in a circle, creating layer of icing swirls. Lift the nozzle in such a way that it leaves a pointy end. Repeat the process with rest of the cupcakes.
  • Enjoy these cupcakes in this winter along with tea , coffee or just like that.                                                                                                                            

Minggu, 15 November 2015

Mushroom Rolls

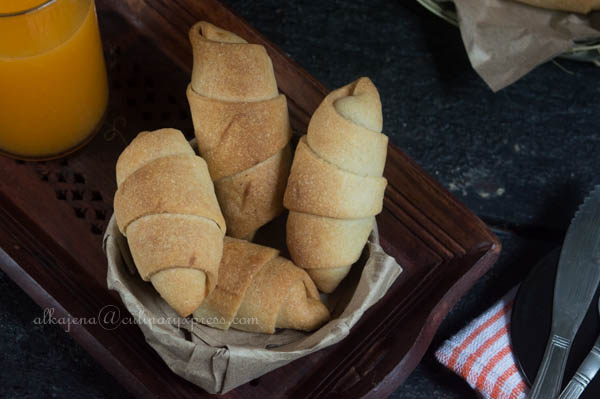
A roll is a British savory pastry snack popular in European Countries. In addition to being sold at retail outlets, they are also available from bakeries as a take-away food item. A miniature version is popular as a buffet or party food. The basic composition of a roll is generally a filling of meat or any savory things are rolled between these puff pastry sheets and baked with egg glazed or milk on top. They can be served either hot or cold. 
These Mushroom rolls is so light and uses much lesser amount of butter than the original puff pastry recipes and that is why I like it to have it in my morning breakfast as often as possible. It is one of the most quick and easiest recipes to make. So for this Foodie Monday BlogHop theme of Baking prompt me to share this recipe with you all.

Cuisine: British
Serves- 12 to 14
Preparation Time: 30 minutes
Cooking time: 3o minutes
Ingredients:
  • 2 cups All purpose Flour
  • ½ cup warm milk
  • ¼ cup Extra Virgin Olive Oil
  • 1 teaspoon each of sugar and salt
  • 1 teaspoon active dry yeast
  • 7 teaspoon of butter for layering
For the Filling
  • 500gms mushrooms
  • 1 large onion
  • 1 teaspoon ginger shredded
  • 1 teaspoon of garlic finely chopped
  • 1 medium size tomato finely chopped
  • 2 green chilies finely chopped
  • ¼ teaspoon turmeric
  • 1 teaspoon garam masala
  • salt to taste
  • 1 teaspoon of Olive oil 


Let’s learn how to make Mushroom Rolls
  •  Wash and chop the mushrooms and pat them dry.
  • Take a pan and add olive oil and once it is hot, add the chopped green chillies and chopped onions. Sauté till the onions becomes brown.
  • Add the chopped ginger and garlic and sauté for a minute. Add the chopped tomatoes and the gram masala. Sauté till the tomatoes become mushy .Add salt and turmeric powder.
  • Add the chopped mushrooms and cook on high flame for 4 to 5 minutes till the mushrooms are cooked and dry. Take off from heat and let it cool.
  •  Now dissolve the yeast along with the sugar in warm water. After 5 minutes you will notice bubbles coming from the yeast. Now you know your yeast is ready to be used.
  •  Take a deep bowl and mix salt with the all purpose flour. Make a well in the center of the flour and pour the yeast mixture. Add the olive well and start kneading the dough with required amount of warm milk to make soft dough. Make sure that it is not sticky.
  •  Wrap the dough in a cling film and keep in the refrigerator for minimum half an hour.
  •  Now take out the dough and divide it into eight equal parts. Now dust the kitchen top with flour and take one part of the dough and roll in the shape of a thin chapatti or flat bread. Apply a teaspoon of butter over it and keep aside. Repeat the same for the rest of the dough and keep stacking it bone over the other applying butter over each chapatti. Do not apply butter on the top layer.
  •  Now roll these stack of chapattis  together to make about a 10 inch diameter round which is quite big in size so you have to use your kitchen counter for this purpose. Now with the help of a pizza cutter divide the circle into 12 to 14 equal halves.
  • Now preheat the oven to 180 degree.
  • Place 1 tablespoon of fillings on the wider side and fold both the sides and starts rolling from the wider wedges to the tip. Repeat the process for rest of the rolls and let them rest for minimum 15 minutes .
  •  Arrange them nearly in rows on a greased baking sheet, leaving a little space between pieces. Bake in a preheated oven at 180 degree for about 15 to 20 minutes or until golden brown. Serve warm with an Orange Juice and enjoy this for your breakfast.

The pastry recipe has been adopted from http://www.yogurtland.com/2006/11/22/feta-rolls/


Jumat, 13 November 2015

Brown Rice Biryani

A whole grain of rice has several layers. Brown rice is produced only when the outermost layer, the hull, is removed which does not affect much to the nutritional value of the rice. White rice is produced when the brown rice is further milled to remove the bran. During this process the rice has lost many of its nutrients. The resulting white rice is simply a refined starch that is largely bereft of its original nutrients.


Brown rice is a very important source of food fiber that is necessary to improve health in general and digestion in particular. Food fiber is a thing that can help you feel satiated for a long time, giving you the sense of fullness. It is able to withdraw toxins and excess residue that pollute intestines and the “bad” cholesterol that is to blame for development of atherosclerosis. Apart from that, food fiber can prevent abrupt drops of blood sugar that cause the sense of hunger when the body does not actually need nutrition thereby reducing the risk of obesity. 
Read more at http://www.vegkitchen.com/tips/10-reasons-why-brown-rice-is-the-healthy-choice/.

Biryani, is an evergreen classic dish, which really needs no introduction. Biryani is a complete meal in itself. It's  one of the most loved delicacies of the country. It is believed that Mughals were the first to introduce Biryani in North India . Biryani flourished in some of the notable Muslim centres throughout the country - including Lucknow, old Delhi and Hyderabad, to name a few - after which it was gradually embraced by all.  Do try out this authentic Biryani Recipe made with  the goodness of Brown Rice and you will know what I mean.

Prep time - under 10 mins
Soaking Time: 1 hour
Cooking time - under 30 mins
Serves -2
Ingredients:
  • Brown rice - 1 cup ( I used Dawat Quick Cooking Brown rice)
  • Onion - 1 medium size
  • Fried onions- 1 cup
  • Turmeric powder- ½ tsp
  • Ginger garlic Paste-  1 tbsp
  • Green chilli - 2 slit
  • Yogurt-1/2cup
  • Garam masala-1/2 tsp
  • Saffron-5 to 6 strands
  • Milk-1/4 cup
  • Ghee-1 tsp
  • Kewra water- a few drops
  • Mixed Vegetables -Carrot – 1,Beans - 5-6,Baby Corn- 2 to 3,Cauliflower-2 florets,Peas - fistful 
  • Paneer- 100 gms
  • 1 tbsp mint leaves
For the seasoning

  • Oil - 1 1/2 tbsp
  • Cloves - 2
  • Green Cardamom - 2 
  • Cinnamon - 1 inch piece
  • Star Anise-1 no
  • Mace- 1 no
  • Bay Leaf-1 no
  • Shah Jeera- 1 tsp
  • Wash and soak brown rice for a minimum of 1 hour  in hot water.
  • Cut onion into thin slices. Peel skin and cut carrot into thin strips. Cut beans, baby corn into 1 inch pieces. Cut the cauliflower into small florets.
  • Cut the paneer into cubes and shallow fry in 1 tsp of oil and keep it aside.
  • Heat sufficient water in a deep non stick pan, add rice, salt, cinnamon, cloves, star anise, green cardamoms , Bay Leaf, mace, a tsp of oil and cook.When the rice is almost done strain it into a bowl . Put 1 tsp ghee to the rice and keep aside.
  • Heat 2 tbsp oil in another non stick pan, add a tsp of cumin and once it starts to splutter, add the sliced onion and slit green chillies and saute till it turns brown.   Add ginger garlic paste , turmeric powder, salt and sauté till the raw smell of the masala goes away. 
  • Add the mixed vegetables , adjust salt and cook for 4 to 5 minutes till the vegetables are half done. Add paneer and yogurt and mix. Add garam masala powder and mix again. Add fried onions to it and  cook till slightly dry.
  • Take saffron and milk in a small bowl and heat in a microwave oven for ½ minute. 
  • Spread the rice over the cooked vegetables. Sprinkle saffron milk,  some fried onions,kewra water, garam masala powder, a few fresh torn mint leaves. Cover the pan and seal with silver foil. 
  • Heat a tawa and place the pan over it and cook 10-12 minutes on low heat. Serve hot with fresh some chilled Raita of your choice.

“This recipe is been created for The Urban Spice and KitchenAid India Diwali Contest” using Brown Rice as an ingredient (www.theurbanspice.com)


Kamis, 12 November 2015

Cumin Shortbread Biscuits

Shortbread is a type of biscuit  traditionally made from one part white sugar, two parts butter, and three parts flour (by weight). The use of plain white (wheat) flour is common today, and other ingredients like ground rice or cornflour are sometimes added to alter the texture. Also, modern recipes often deviate from the pure three ingredients by splitting the sugar portion into equal parts granulated sugar and icing sugar (powdered sugar) and many further add a portion of salt.Shortbread is baked at a low temperature to avoid browning. When cooked, it is nearly white, or a light golden brown. It may be sprinkled with more sugar while cooling. It may even be crumbly before cooled, but will become firmer after cooling.
These crisp shortbread biscuits are extremely easy to make and have very few ingredients. They are not low in calories, but they make a delicious treat at special times of the year. Shortbread biscuits can be made in a variety of shapes. Whatever the shape you decide to use - the taste remains the same.....meltingly light and buttery. These make ideal gifts, and as they are made with butter, they last for quite a while. Pack them up in an attractive box, tin or bag and gift someone.

This recipe has been adopted from a old newspaper clipping which I used to collect as a teenager but never had the time to make it. During those time it was a fascination to collect the clippings and write in my Diary which I used to cook in free time. But the collection becomes so huge that it becomes impossible to mark which one to cook and which one to skip. Career , Marriage, Motherhood had taken a lot of of time  and these treasured recipes have never made it to my To Do List......But an accidental encounter which introduced me to the world of Blogging opened this Pandora Box of Recipes. I am glad that I came to know this initiatives of Srivalli of http://cooking4allseasons.blogspot.in/2013/10/cooking-from-cookbook-challenge-for.html where we have to cook from cookbook, television shows and newspaper clippings, family recipes and share with the world.
Ingredients:
  •  2 cup all purpose flour
  •  1 cup butter
  •  2 tsp cumin seeds, heaped
  • 1/2 cup granulated sugar
  • 1 tsp salt

 
Let's Learn how to make Shortbread Biscuits:
  • Preheat the oven at 180 C.
  • Prepare a square baking tin by lining it with a parchment paper.
  • Keep the butter in the freezer for at least half an hour.
  • Meanwhile whisk together the flour and salt.
  • In a separate bowl add the sugar and cumin seeds.  Rub the sugar and cumin seeds together for couple of minutes. This will give a cumin flavoured scent to your biscuits.
  • Mix the flour and sugar cumin mixture together in a large bowl, and then rub in the butter - as if you were making shortcrust pastry. Use the tips of your fingers and ensure that all the butter has been rubbed in -- it should resemble sand like texture.
  •  Then start to knead the paste, pushing it together to form a smooth dough - the heat of your hands whilst kneading helps it form.
  •  Roll out the shortbread dough and using a biscuit or cookie cutter or with the use of  scale,  mark it like rectangles  about 1/4" in thickness and mark them.. Place them on a well greased baking tray or cookie sheet.
  •  Now cover the tin with a cling film and place in the freezer for at least 30 minutes.Bake it directly from the freezer for 25 to 30 minutes. or until they are pale and golden - but NOT brown.
  •  They will still feel very soft when out of the oven. Cut them out into equal size rectangles as soon as it it out of the oven with a very sharp knife
  • Allow to cool completely before storing in an airtight tin or container.

NB: These will last for about 10 to 14 days in a cool, dry and dark pantry. They can also be frozen with great results!


Linking this recipes to Srivalli of http://cooking4allseasons.blogspot.in/2013/10/cooking-from-cookbook-challenge-for.html