Minggu, 30 Agustus 2015

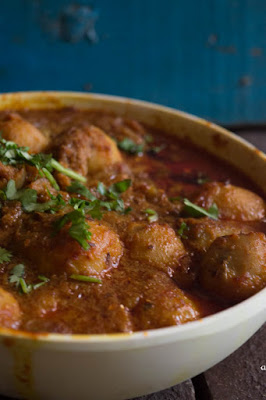
Dahi Bara Aloo Dum - The Quintessential Street Food of Odisha


The millennium city of Cuttack is famous for various reasons -  silver filigree work, Historical Barabati fort, Famous Barabati stadium among others. Besides this, Cuttack is famous for one more thing and that is the ‘Dahibara-aloodum’. The name itself conjures up thousands of memories and for anyone who’s everbeen to Cuttack or hails from the same, needs no intro to this legendary street food – Dahi Bara Aloo Dum and Guguni, mostly known as “Dahi Bara Aloo Dum”.

“Aloo dum Dahi bara”, A wholesome meal in itself is said to be the staple food of Cutkis, a name synonymous with the people of Cuttack. People love to have it for breakfast, lunch and it is considered an all- day snacks item. It provides timely carb in the form of potatoes, which replenish energy and the butter-milk given at the end of the snacks is a relishing drink to beat the scorching summer. While the tangy flavor of the dahi bara revives the taste buds! Typically, it is served with ghuguni (A spicy Curry made of chick peas) and garnished with sev, onion and coriander leaves. 

The savory tartness of the dahibara perfectly complements the spicy aloodum and ghuguni and all of it wonderfully comes together with the crunchiness of the onions and the bhujia sev.

This local delicacy is so popular that hardly anyone, whether a local person or a visitor from outside, misses the chance to taste it. From early morning till late in the night one can find the vendors selling the dahibara across the city.Dahibara of Cuttack is so famous that people from faraway places, come to the city just to have a taste of it. People residing in far off places like Sambulpur, Paradip, Rourkela, Balasore, Berhampur and many other such area carry this item to their places.

But despite its iconic status within the state, it’s a irony that it hasn’t received the limelight it truly deserves. Many people outside Odisha hardly knows about it. It is a privilege when my fellow bloggers decided on the theme for our weekly event FOODIE MONDAY BLOG HOP as street Food , my happiness knew no bound as I am very confident that not only this famous street food of Odisha  can stand tall , it may exceed many iconic street foods in their lovability quotient. For a beautiful compilation of 25 Indian street foods every desi foodie simply must try, do click on the link www.folomojo.com/25-indian-street-foods-every-desi-foodie-simply-must-try/. So here is my dish for the Third " FOODIE MONDAY BLOG HOP" event dish on the Theme" STREET FOOD".....Dahi Bara Aloo Dum - The Quintessential Street Food of Odisha

My own childhood memories associated with this famous street food is the excitement at seeing the vendor selling Dahi Bara Aloodum in his drummed container and serving it in a thola ( container made out of sal leaves).After reading all this, you must be thinking … Is it possible to prepare this dish at home? The answer to this question is, yes of course! So here goes my interpretation of the famous street food of Odisha…… Aloo dum dahi bara. 


Dahi Bara


Ingredients
Serves:4

  • 1 cup - Whole Urad Dal
  • 1 tsp - Baking soda
  • Oil for frying
For the dahi

  • 1 cup - Yogurt
  • 1 cup - Water
  •  Salt to taste
  • Cumin and red chili powder
For the tempering

  • 1 Tablespoon - Oil
  • ½ tsp - Mustard seeds
  • 2   nos - Dry red chillies
  • 1 sprig curry leaves

Let’s learn how to prepare Dahi Bara:


  • Soak the urad daal in water overnight. After the dal is perfectly soaked (it will feel light and puffed up), grind to a smooth batter. Keep it aside for 2 to 3  hrs for fermentation in a dark, warm place. If you are short of time, you can add baking powder and salt to it and mix well. Leave it for 1hr.


  • From the batter make small balls or baras. Slightly flatten them. In a frying pan heat oil. Fry the Baras till golden brown. Soak the fried vadas in salted water till soft and fully soaked. After this take them out of salted water and keep aside.


  • In a small vessel, mix the yogurt and water together. Add salt and roasted cumin and dry red chilli powder to it. Put the soaked Baras in it.


  • Now heat 1 teaspoon of oil in the frying pan. Add mustard seeds, curry leaves and red chilies and let them splutter. Pour this mixture on the Dahi Bara. 

Ghuguni


Ingredients: 


  • 1 cup of dried peas soaked overnight in water
  • 1 large tomato finely chopped
  • 1 large onion finely chopped
  • 1 tbsp ginger garlic paste
  • 1 tsp of cumin seeds
  • 1tsp of cumin powder
  • 1 tbsp of coriander powder
  • Fresh coriander leaves
  • 1tspRed chilli powder to taste
  • 2 Green Chilies
  • ½ tspTurmeric powder
  • 1tsp garam masala
  • 2-4 tsp cooking oil
  • Salt to taste
Let’s learn how to prepare Ghuguni:


  • Soak the dried white peas in water for 3 to 4 hours. Boil the soaked peas with some salt till soft.
  • Put 2 tbs of oil in a frying pan and put the cumin seeds and let them splutter. Add green chillies, finely chopped onions and sauté till onions becomes brown in colour.
  • Add the ginger garlic paste and sauté till the raw smells of the garlic goes away. Add the chopped tomatoes and sauté till it becomes mushy and oiul comes out of it. Add a tsp of water to prevent burning.
  • Now add the turmeric powder, coriander powder, cumin powder, red chilli powder to it and continue to sauté for one more minute.
  • Add the boiled peas, little water and salt and cook for 10-15mts on slow flame or till you achieve the desired consistency of the gravy. Here the gravy should not be too watery nor too dry.
  • Add the garam masala and the chopped coriander leaves and keep it aside.

Aloo dum


Ingredients:  

  • 250 gms small Potatoes
  • 2 tsp oil
  • 1 large onion finely chopped
  • 1 large tomatoes finely chopped
  • 2 dry red chillies
  • 1 tsp Cumin Seeds
  • 2 tsps Red Chili Powder
  • 1/2 tsp Turmeric powder
  • 1 tbsp Ginger,Garlic Paste
  • 1 tsp coriander powder
  • 1tsp Garam Masala
  • salt


Let’s learn how to do the Aloo Dum:


  • Boil the Potatoes in enough water. Cool the boiled Potatoes in cold water, and peel the skins of the potatoes.
  • In a pan, add oil, and the cumin seeds and the dry red chilies. Once it splutters, add the finely chopped onions and fry till it turn brown.
  • Add the ginger garlic paste and fry till the raw smells of the paste goes away.
  • Add the chopped tomatoes and sauté till oil comes out of the gravy.
  • Add the coriander powder, turmeric powder, red chilli powder, salt and sauté for one more minute. 


  • Add the boiled and peeled potatoes and sauté for 5 to 7 minutes.
  • Then add some water to it. Cook on slow flame till the gravy thickens and the  Spiced Gravy soaks into the very core of the Potatoes, and these turn brown. Then add Garam Masala to it and  remove it from stove.

Now comes the final show time of assembling the Dahi Bara Aloo Dum and Ghuguni.


Ingredients:
  • Dahi Bara
  • Aloo Dum
  • Ghuguni
  • Chopped Onions
  • Chopped Coriander leaves
  • Chopped green chillies
  • Cumin red chilli powder


    • In a bowl, place 2-3 dahi vad as and a little bit of dahi. Then scoop in some aloo dum followed by  ghuguni. 


      • Garnish the dish with chopped onions, chopped green chillies, sev, chopped coriander leaves and top it with some black salt and cumin red chilli powder.
      • Now dig into it and savor every bite of this street delicacy of Odisha .




      Senin, 24 Agustus 2015

      1st BLOG ANNIVERSARY- CHOCOLATE MUD PIE


      Finally my baby has turned 1……yes amazing…..Culinary Xpress has completed one year on this day…24th  August,2015. It seems a dream….the year long journey has been wonderful.


      It is rather incredible to believe that, only one year ago, I embark on this blogging journey, extending my forays into the world of food by learning about technology which is alien to me like CSS and html coding, embracing a new medium through which I could share my love of cooking and photography and, most important of all, embracing a whole new community out there who are just as passionate as I am about all things related to food.


      I am immensely happy by the shape and form which my blog has evolved in the past year, and hope that you too had a great time visiting my space. Every day I am surprised and amazed at all the wonderful people and opportunities that this blog has brought into my life. I look forward to seeing what’s to come and continuing to share it with you for many more years.  


      To my subscribers and regular readers, a big THANK YOU  for your time in visiting and reading my blog, cooking your way through some of my favourite recipes, and leaving your valuable feedback along the way. It is truly your appreciation which motivates me to further progress and improve Culinary Xpress.


      The most wonderful aspect of food blogging has been the interaction with fellow food bloggers and photographers who have definitely shaped the way I am today in the form of adopting various new cuisines and Photography techniques.


      Over the course of this one year, I have learnt so many things about blogging…which I had no clues about before starting this Blog. When I started food blogging by the end of August,2014 I knew nothing about how to start a food blog, about food photography, search engine optimization, monetizing my blog or even traffic generation. I just knew it would be something I would love and have fun learning  – and I was right. I can’t say I’ve mastered them but I am very happy with what I have learnt in the process.

      • Being passionate about your purpose of starting a food blog is the foundation of all success. Nothing is more magnetic than Passion which comes through your passionate writing and stunning photographs.
      • Look out for every available resource . Invest in downloading tutorials and food photography books because every penny you invest will yield a harvest.
      •  Keep doing what you love and that is all you need to get to where you are going. Keep writing, practicing, learning how to improve your photography, traffic generation and SEO.
      • Take the time  to comment on other blogs every day. Not only does this help the blog community as a whole but it increases the number of back links to your web site. 
      • Enjoy the journey called Food Blogging. Don’t rush blindly towards the finish line without taking the time to learn and master the basic things.


      I had so much plan for the day but due to a unforeseen mishap , decided for this simple but decadent Chocolate Mud Pie. And how was it in the end? Well, if you are looking  for something really, really chocolaty, then this is the excellent choice for you! Beautiful taste of chocolate in combination with a thin pie crust – yummy :)Chocolate Mud Pie is a homemade fudge pie with rich and dense, moist chocolate filling….

      To make the pastry shell
      • 1 cup of all purpose  flour
      • 50g of butter
      • Ice Cold water enough to make a smooth dough
      For the filling
      • 4oo gms hung yogurt
      • 200 gms of Condensed milk
      • 50 gms of heavy cream
      • 4 tbsp butter
      • ½ cup dark chocolate  broken into pieces
      • ¼ cup walnut kernels for toppings


      Let's learn how to make Chocolate Mud Pie........
      • To make the pastry cell,  butter was cubed and rubbed in the flour lightly with finger tips. To make the pastry crumbly start by adding a tablespoon of ice cold water, gradually increasing to make the dough. 
      • Once the dough is ready, cling film it and place it in the fridge to chill for half an hour.
      • Roll the pastry on a dusted surface and place it in the tart tin.  Press the dough into the corners of the tin using your fingers. Prick the pastry base with a fork so that it doesnot bloat. Trim the edges and Chill for 30 mins in the fridge.
      • Preheat oven to 200C. Fill the pastry case with a circular sheet of baking paper and add beans to weigh it down. Bake for about 20 mins, then carefully remove the paper and beans and cook the pastry for 5 mins more.
      • For the filling mix together hung yoghurt, condensed milk and keep aside.
      • In a double boiler, melt the chocolate stirring continuously till the chocolate melts, add the butter and heavy cream. Stir it well and take off the heat. let it cool for some time. Then add this to the yogurt and condensed milk mix and pour into the  slightly cooled tart shell baked earlier. 
      • Sprinkle lightly toasted walnut kernels over it .
      • Bake the above at 180 degree for 30 to 35 minutes or till the filling sets properly. Transfer to a wire rack and cool.


      Me and my son had a great time relishing this Pie........Do try this one at home and you will start to fall in love with this simple Mud Pie .....  


      Jumat, 21 Agustus 2015

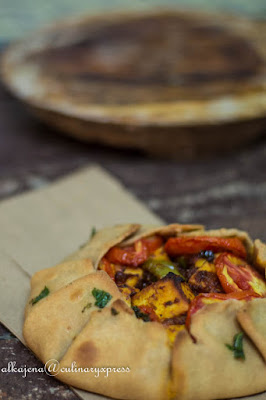
      Whole Wheat Paneer Capsicum Galette


      A pie is homey. A tart is fancy. And a Galette splits the difference, but is easier than either one.

      I didn’t even know what a Galette was until this past year or so and now I’m kind of obsessed with them. Galette is a term used in French cuisine to designate various types of flat round or free form crusty cakes. They are pretty simple once you get the habit of making the crust, and you can pretty much bake any fruit or veggie in one of these free spirited pies.


                  Galette which is also called a crostata if you’ve got an Italian connection is a free-form pastry, baked without the stability of a pie pan or tart ring. The dough is rolled out flat, then folded around the filling. The appeal of a galette lies in its rusticity. Its juices can leak, the pastry can tear, the filling can sink at the top; it doesn’t matter. As long as you’ve used good fruit or vegetables for the filling and real butter for the dough, it will bake up into something golden brown and utterly gorgeous, the kind of pastry you’re happy to whip up anytime, not just on special occasions.


        If you are trying your hand at baking , mastering a galette before trying pies and tarts will give you confidence. For the baking expert, galettes offer ample opportunity for personal expression. Once you have the basic formula for making the galette, you can change it up to suit your tastes, the fruit in season, the leftover vegetables in your fridge.


      A savory galette is the easier and more streamlined cousin of a classic quiche. Quiche is a savoury, open-faced pastry crust with a filling of savoury custard with cheese, meat, seafood and vegetables. Quiche can be served hot or cold. It has a buttery pastry filled with any combination of vegetables, cheeses and meats, but without the need to make a custard to anchor it all. In this galette recipe, roasted paneer and green capsicum are combined with tomatoes and fresh herbs for a ratatouille-like mix with a bite, all nestled into a hearty whole-grain crust. Feel free to use any combination of cooked vegetables instead, even leftovers from the fridge.  Serve it as you would  with a salad for lunch or a light dinner. The outcome was delicious. Crusty, crispy and yummy, filling tasting like grilled paneer. Even typing it is creating a desire to eat it again :-)


      Ingredients:

      For the PASTRY Base

      • Whole Wheat Flour - 1 ½ cup
      • Chilled Butter – ¾ cup
      • Salt - 1/2 tsp
      • Ice cold water - 1/4 cup water

      For the Filling:

      • Paneer - 250 gms ( cubed)
      • Green Capsicum- 1 (Cubed )
      • Onion- 1 ( Cubed)
      • Tomato-2 cut into circles
      • Tomato puree- 2 to 3 tbsp 
      • 1 tbsp Italian seasoning
      • I tbsp coarsely ground pepper
      • 1 tsp red chilli flakes
      • Salt
      • Oil-1 tsp
      • Melted  Butter - 2 tbsp and 
      • Mixed Herbs-1tsp for brushing 

      METHOD:
      • Mix together flour and salt  Mix in the butter chunks and combine till the flour looks like bread crumbs. Sprinkle ice water little at a time to bring the dough together. Don’t knead. Add a more ice water little by little if you prefer pliable dough without cracks.
      • Cover this dough with cling foil and keep it in fridge for an hour.
      • Cut the paneer , onion and capsicum into cubes and keep aside.
      • Rub the paneer with salt, pepper, chilli flakes and Italian seasoning and keep aside.
      • In a pan put, 1 tsp of oil. Once hot, add the onion, capsicum and toss for 1 minute on high flame so that the capsicum becomes tender.
      • Add the tomato puree, salt,coarse pepper powder and cook for a minute or so.
      • Stir in the Paneer and toss well so that the masalas are well coated with the paneer.  Do not over cook.
      • Check the seasoning and take off from the stove.


      • Preheat the oven at 180C. Take out the dough. Divide into 4 equal portions and make round balls , roll each into a rough circle and place the filling in the centre for Galette.


      • Line a baking tray with butter paper. Place the rolled out galette on the tray. Scoop out the capsicum paneer mixture and spread on each disk, leaving 1 and a quarter inches on the sides for folding.
       

      • Place a slice of tomato covering the paneer .sprinkle salt and Italian seasoning over it and start to fold the side overlapping one fold over the other.


      • Bake them at 180 degrees for approximately 30 to 35 minutes or till the pastry is crispy and golden . 


      • Transfer to a cooling rack , leave for 10 minutes . Brush the Galette with warm butter and mixed herb. Serve warm along with a dip of your choice.


      This recipe has been adopted from http://masterchefmom.blogspot.in/ which has some great collection of recipes from Traditional to Modern, Street food to Home Cooked, Tiffin Box to Party recipes, Breads, Cakes and many more. With step by step pictures for every recipe MASTERCHEFMOM will excite you to try!!!


      Happy Cooking..........

      Sending this Whole Wheat Paneer Capsicum Galette dish  to " FOODIE MONDAY BLOG HOP" event